Pre-defined forms that are available include:
These are basic forms with optimized settings. To create different boxes use these base forms and adjust the dimensions.
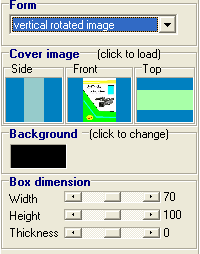
To load existing images to cover the virtual box, click on the preview image box. A dialog will appear for selecting and opening files. In the capture image above, the front image is loaded. The Side and Top image have not yet been selected.
Please note: as a virtual box can never have more than three faces, BoxMaker only allows you to select three images. The selected images are repeated on the opposite face. Top = top and bottom. Front = front and back. Side = left and right.
The image used can be the result of scanning the side of an existing box, a digital photo or a drawing made with an image editor like Windows Paint (under start menu Accessories). To avoid excessive stretch, make sure that the format of the image coincides roughly with width/height ratio shown to the right of the three slide-bar. In the example above, the width of the front image compared to the height of the front image should be close to 70:100.
To change background color, click on the rectangle (shown as black rectangle in the capture image). A color selection dialog will appear.
The dimensions of the box can be adjusted using the three slide-bars.